|
|
|
Who's Online
There currently are 5828 guests online. |
|
Categories
|
|
Information
|
|
Featured Product
|
|
|
 |
|
|
There are currently no product reviews.
 ;
Once again owner-manual.com has saved the day for me, and come through with the manual I need. I looked other places too, and couldn't find it anywhere. Thank You owner-manual.com!!! You're the BEST!
;
very good quality that can be magnified several times, and it remains readable.
For sure I will return next time the need for a service manual arise.
;
The service manual is really great - thanks to it I was able to install the laser unit and thus "save" my CD-player, which seemed to be impossible before I had the manual.
;
Downloaded the Service manual OK of the Technics Piano and have now repaired it and its going fine. Excellant; thank you for the fine servce. A.M
 ;
This site is working fine! Did buy a manual for SX-EX25L and after a while I could download it and fix the problem. Nice and easy!
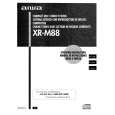
MODEL NO. SX-LM200
SPEAKER DISASSEMBLY INSTRUCTIONS
Type.1 Insert a flat-bladed screwdriver into the position indicated by the arrows and remove the panel. Remove the screws of each speaker unit andthen remove the speaker units. Type.4
TOOLS
1 Plastic head hammer 2 (-) flat head screwdriver 3 Cut chisel
1
Type.2 Remove the grill frame and four pieces of rubber caps by pulling out with a flat-bladed screwdriver. Remove the screws from hold where installed rubber caps. Insert a flat-bladed screwdriver into the position indicated by the arrows and remove the panel. Remove the screws of each speaker unit and then remove the speaker units.
2
3
How to Remove the PANEL, FR
1. Insert the (-) flat head screwdriver tip into the gap between the PANEL, FR and the PANEL, SPKR. Tap the head of the (-) flat head screwdriver with the plastic hammer head, and create the clearance as shown in Fig-1. Insert the cut chisel in the clearance, and tap the head of the cut chisel with plastic hammer as shown in Fig-2, to remove the PANEL, FR. 3. Place the speaker horizontally. Tap head of the cut chisel with plastic hammer as shown in Fig-3, and remove the PANEL, FR completely.
2.
Type.3 Insert a flat-bladed screwdriver into the position indicated by the arrows and remove the panel. Turn the speaker unit to counterclockwise direction while inserting a flat-bladed screwdriver into one of the hollows arround speaker unit, and then remove the speaker unit. After replacing the speaker unit, install it turnning to clockwise direction unitil "click" sound comes out. Fig-1 Fig-2
Fig-3
How to Attach the PANEL, FR
Attach the PANEL, FR to the PANEL, SPKR. Tap the four corners of the PANEL, FR with the plastic hammer to fit the PANEL, FR into the PANEL, SPKR completely.
70
 $4.99 XRM88 AIWA
Owner's Manual Complete owner's manual in digital format. The manual will be available for download as PDF file aft…
|
|
|
> |
|