|
|
|
Who's Online
There currently are 5778 guests online. |
|
Categories
|
|
Information
|
|
Featured Product
|
|
|
 |
|
|
There are currently no product reviews.
 ;
This manual is very good. 303 pages scanned in a very high resolution. My camera has bad, leaking capacitors which all of the V5000 models are suffering from these days.
There is a huge part list with all capacitors, transistors etc. in this manual which helped me a lot. Otherwise I would not have been able to buy replacement parts.
The dissassembly guide is very enormous and detailed. Unlike on the Panasonic MS1 manual I downloaded here it actually looks like the real parts look. And the screws are labeled correctly, so you shouldn't have any left after the repair. ;)
;
has all the schematics you could need,and very well laid out format also has all part numbers along with an exploded view which is helpful
 ;
Very nice to have! Now it is no problem to understand how it is put together.
Helps me a lot.
;
good scans, all is clear. all pages in order. recommended
;
Très-très bon site, facile, très bon prix.
Au futur besoin, je n’hésiterais à faire appel à vous.
Merci
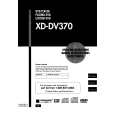
DVD MECHANISM DISASSEMBLY - 3/3 <Except EZ>
GUIDE UP/DOWN
GEAR LOADING
(L3)
(L6)
GEAR PULLEY (L6)
(L4)
BASE MAIN BELT LOADING PWB ASSEMBLY LOADING (H1)
(L6) (C2) (S5)
BASE MAIN
(A) (A) (B) (L5) FIG. (A) (C) (B) GUIDE UP/DOWN GUIDE UP/DOWN (A) (B) FIG. (B) (S4) FRAME ASSEMBLY UP/DOWN
GUIDE UP/DOWN
FIG. (C)
Fig. 4-4
5. Frame Assembly Up/Down
Note Put the Base Main face down(Bottom Side) 1) Release the Screw(S4) 2) Unlock the Locking Tab(L3) in direction of arrow and then lift up the Frame Assembly Up/Down to separate it from the Base Main. Note � When reassembling move the Guide Up/Down in direction of arrow(C) until it is positioned as Fig.(C). � When reassembling insert (A) portion of the Frame Assembly Up/Down in the (B) portion of the Guide Up/Down as Fig.(B)
8. Gear Loading (Fig. 4-4) 9. Guide Up/Down (Fig. 4-4)
1) Move the Guide Up/Down in direction of arrow(A) as Fig.(A) 2) Push the Locking Tab(L5) down and then lift up the Guide Up/Down to separate it from the Base Main. Note When reassembling place the Guide Up/Down as Fig.(C) and move it in direction arrow(B) until it is locked by the Locking Tab(L5). And confirm the Guide Up/Down as Fig.(A)
10. PWB Assembly Loading
Note Put the Base Main face down(Bottom Side) 1) Release 2 Screws(S5) 2) Unkool the Loading Motor Connector (C2) from the Hook (H1) on the Base Main. 3) Unlock 2 Locking Tabs(L6) and separate the PWB Assembly Loading from the Base Main.
6. Belt Loading(Fig. 4-4)
Note Put the Base Assembly Main on original position(Top Side)
7. Gear pulley (Fig. 4-4)
1) Unlock the Locking Tab(L4) in direction of arrow(B) and then separate the Gear Pulley from the Base Main.
11. Base Main(Fig. 4-4)
-87-
 $4.99 XDDV370 AIWA
Owner's Manual Complete owner's manual in digital format. The manual will be available for download as PDF file aft…
|
|
|
> |
|